ACO File Server User Guide
1.Introduction
2. Connecting to the file server
3. File Server Management page
4. Disk drive operation
5. Adding new users
6. FTP Server
Introduction
ACO File Server is powered by an unique RAID technology (known as unRAID™). It is similar to a RAID-4 array, in that for every n hard drives, there are n-1 data drives, and a single fixed parity drive. This technology provides protection against a single drive failure, and the Operating System is installed and executes on a standard USB thumb drive.
unique RAID advantages:
- Better fault tolerance: If more than 1 drives fail at the same time, The data of 1 drive is protected, and you will only lose the data on the remaining failed drives. In an unlikely event of catastrophic hardware or software failure, data corruption would be much more isolated than that which could occur with other standard RAID systems. It is almost impossible to lose all your data, since each individual data drive has its own file system.
- Easy capacity expansion. You can install additional drives at any time*,
Unlike other RAID systems, you are not limited to any consistencies in your
use of drives. IDE, SATA, size or speed, any drive can be used, only the
parity drive needs to be the the largest or equal to the largest in
capacity.
*Note: The numbers of drives can be taken is limited by operating system version
- Easily Repairable: These file severs use your standard consumer motherboard, CPU, memory and power supply, this makes finding replacement parts and upgrades extremely convenient.
- Better power management: Not all hard drives are required to be spinning in order to access your data; hard drives not in use are spun down (By default setting), this helps with saving energy, unnecessary wear on the drives, and reduces heat which can cause thermal expansion and ultimately drive failure.
Connecting to the file server
You will require a local area network enabled with a DHCP server to connect to the file server.- Connect a "straight-through" CAT5/E/6 network cable from the file server to your switch or router.
- Power on the file server, waiting for 2 minutes for the file server to completely boot-up. Following 2 beep sounds from the machine's internal speaker, this is to notify the user that the file server is booted and ready.
- Connect to the file server from another computer connected to the local
network.
Windows® User:
from My Computer Address bar or Internet Browser type in: \\tower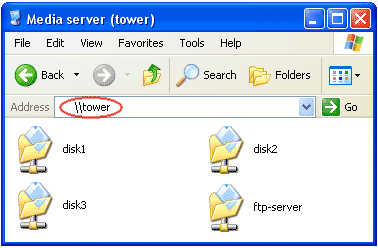
Mac® User:
from Find -> Go -> Connect to Server. type in: smb://tower. Then click on Connect.
Next page, select Registered user, then enter the User name / Password of the file server.By default: the User name is root, without a Password
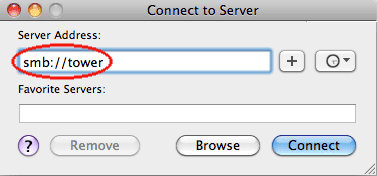
You can set the file server to require a Username / Password to connect (not available on FS-102 series), See Adding new users section.
File Server Management page
The File Server Management page is a web based interface page much like the one for your router/modem.To access the file server management
page for:
Windows® User:
in the address bar of any internet browser, type in: //tower/
Mac® User: in the address bar of any internet browser, type in the sever ip address. such as 192.168.xxx.xxx
*
To find the file server ip address, log-in your local network DHCP
server (such as your ROUTER), then look for DHCP client table. From the DHCP
client table, look for the ip address that has been assigned for "tower" client host name.
By default, the login details are, username "root", with no password. We recommend that you set-up a password for the root user for better security.
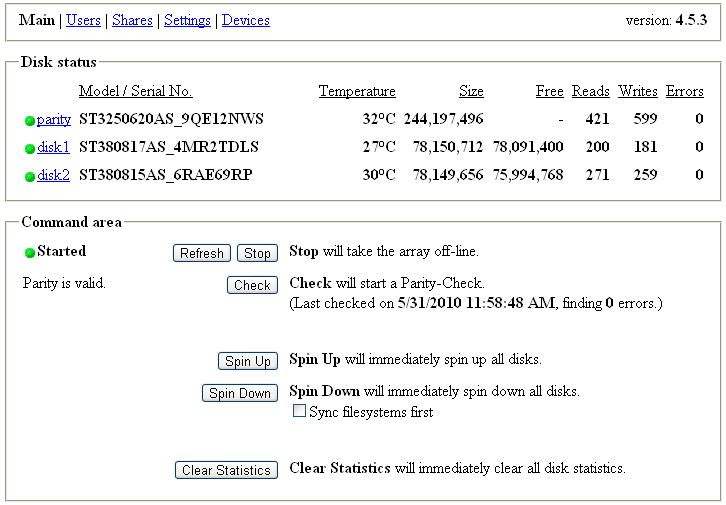
This is the Main page of the file server management. It shows you each hard disk's status, size, model, serial number etc. We highly recommend you copy, print or write down the information on this page and keep it in a safe place. You will quite possibly require it when performing disk drive replacements.
Disk drive operation
1. Replacing a faulty hard drive
There are 2 roles of the hard disk drives in the file server: Parity Drive and Data Drives.
If there is a red status in front of one of your data drives, or there are a number detected errors, this indicates that a hard disk is failing or has failed and will need to be replaced.
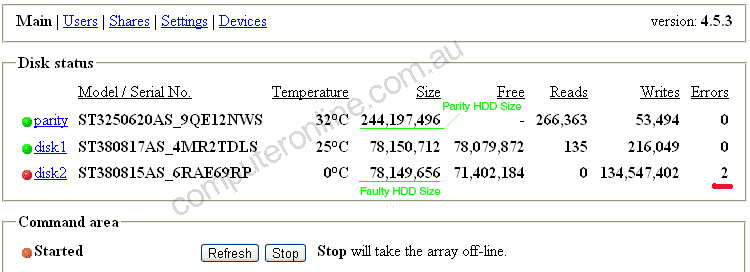
If the failed drive is a data drive, you still can read/write the data from the faulty hard disk over your local network, but is actually the data of the parity drive disk in the file server, not the particular failed hard disk.
a. To replace a faulty data drive:
- Copy data from your faulty hard disk to an available disk. (This step is not necessary, but is a very safe option for redundancy)
- Copy, Print or Write down the information on the main page of the file server management. (particularly to remember which one is the faulty hard disk, and all other hard disks order, status and size)
- Take the array offline using the "Stop" command and then Power down the file server. (on the main page)
- Remove the faulty hard disk by referring to the Model and serial number recorded earlier.
- Replace with a new hard disk. note: the size of the new hard disk must be >= the faulty hard disk and <= the parity drive.
- Power on the file server and wait until it is completely booted.
- In the "Devices" section on the management page, assign the new hard disk to
replace the faulty one. Make sure the parity drive and all healthy data
drives are in the exact order as they were before powering down.
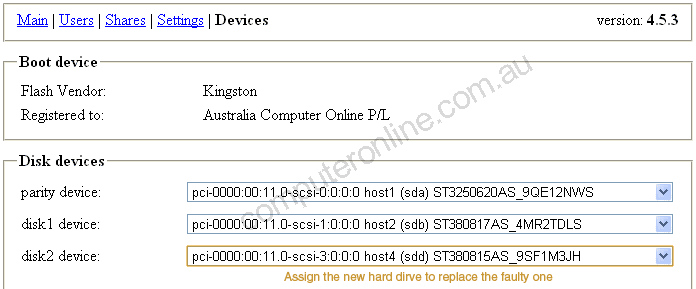
- Main page -> Start will bring the array on-line, start Data-Rebuild... ->
Tick on
I'm sure I want to do this -> Click on Start button to rebuild data back.
After the re-building process has finished, the data on the new drive will be
same as the faulty one replaced earlier.
*Note: don't click on the Restore button.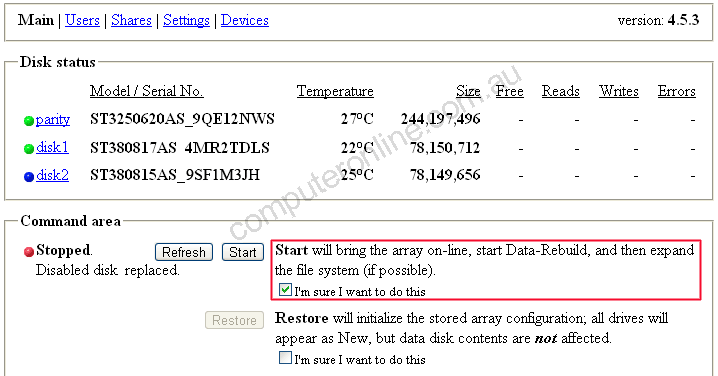
b. To replace faulty parity disk drive
- Copy, Print or Write down the information on the main page of the file server management. (particularly to remember which one is the faulty hard disk, and all other hard disks order, status and size)
- Take the array offline using the "Stop" command and then Power down the file server. (on the main page)
- Remove the faulty hard disk by referring to the Model and serial number recorded earlier.
- Replace the hard disk with a new drive. note: the size of the new parity hard disk must be larger or equal in capacity to your largest data drive.
- Power on the file server and wait until it is completely booted.
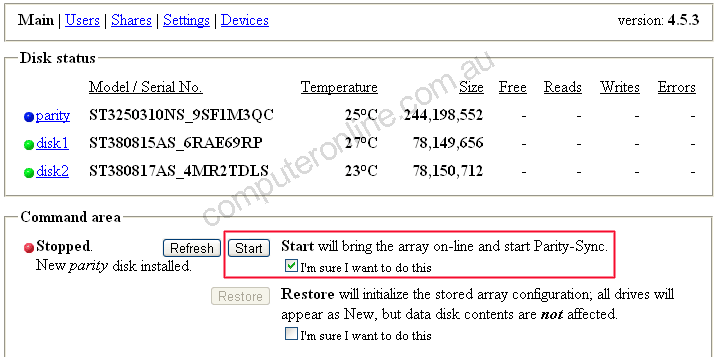
- Go to the Devices of the management page, assign the new hard disk to be the parity drive (may be picked-up automatically by the file server). Make sure all data drives are in the same order as before.
- Go back to Main page -> Start will bring the array on-line and start
Parity & Sync. ->
Tick on I'm sure I want to do this -> Click on Start button
to start Parity & Sync process.
After the process has finished, data is now protected.
Also you can click on the next I'm sure I want to do this under Restore operation - This just re-do the array configuration, all your data will be kept.
2. Add new drives
- Copy or Print or Write down the main page of the file server management.
- Stop and Power down the file server .
- Put a new hard disk in. note: the size of the new hard disk must be less or same than the Parity disk drive. Then power on the file server.
- Main page (the file server management) -> Stop the server (take the Hard Disk array off-line)
- Go to the Devices of the management page, assign the new hard disk to be
the next available data drive. Make sure all data
drives are in the same order as before.
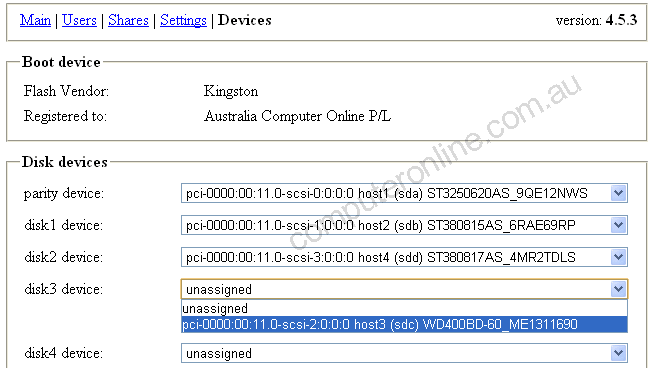
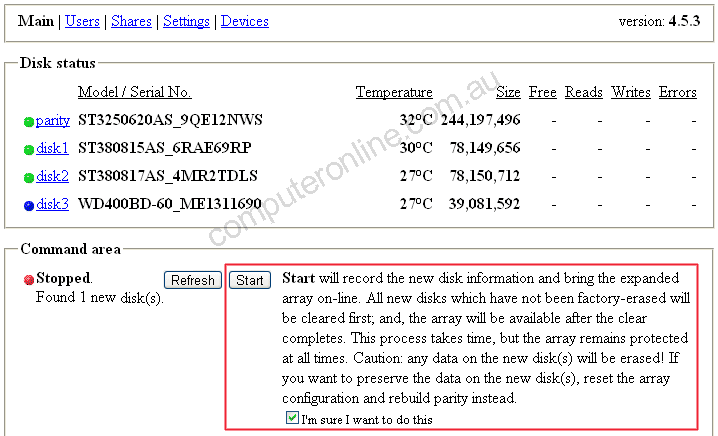
- Go back to Main page -> Start will record the new disk
information and bring the expanded array on-line... ->
Tick on
I'm sure I want to do this -> Click on Start button
to start to initialize the new hard disk. In the initialization process, the
shared storage will not be assessed and any data on the new drive will be erased.
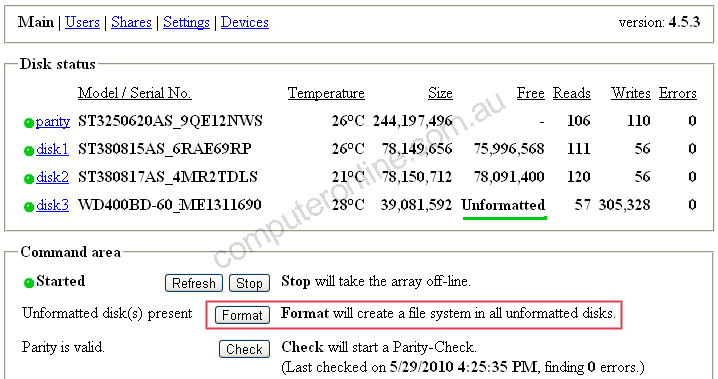
- Format the new disk drive: On the main page -> Click on Format
button. After the new drive has been formatted, you will see a new disk in the shared storage.
3. Restore operation
Restore operation is for re-built a new hard disk array configuration. data disk contents won't be effected.
If only the red status is present for a data hard disk and there are no numbers in the errors field - eg; A drive is disconnected and reconnected while the file server is running.- Copy all the data from the data hard disk drive with the red label to another location. - This will need to be done, because since the red status is present, all the new data to that particular drive is currently writing to the parity drive.
-
Stop the file server -> Restore will initialize the stored array
configuration... -> Tick on I'm sure I want to do this
Data from the time before the red status appeared on the particular hard disk drive will be restored.

- Next page click on the Start button. re-build the parity,
shared storage will be accessible immediately but will remain unprotected until
the Parity-Sync operation is
completed.
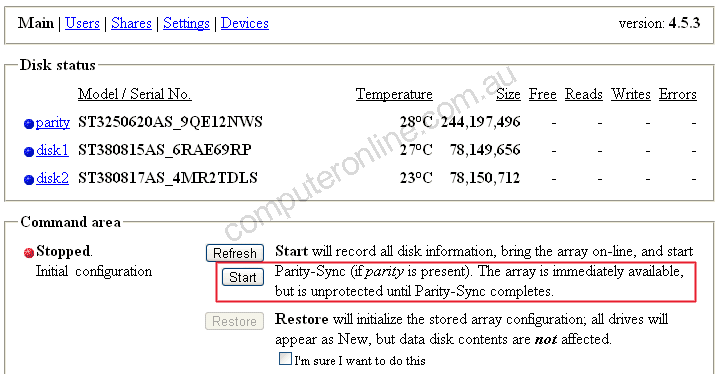
You also can perform Restore operation when you add a new hard disk, change the hard disk order or replace a faulty parity drive.
Adding new users
- Stop the server on Main page of the file server management -> Settings. Under Identifications -> Share security, Change the setting from Simple to User Level, then click on Apply button.
- Go to the Users page. You can add new users and passwords to the file server. Start your file server again to take effects.
FTP server
For example: if you connect to your file server via ftp over an internet connection using username root, you will only have access to files & folders under \disk1\_ftp\root\. You can read, write, and delete as you have all permission for all files & folders in this directory.
- root folder: which is same user / password as your file server user root. So we recommend you set a password for your root user, to prevent unwanted users accessing your ftp server by using root user without password, or you can delete the folder named "root" from \disk1\_ftp\
- ftp folder: this ftp user you cannot be specified a password for it, any user can enter ftp as a username without a password and can access via the ftp folder once logged in. you can delete this folder to disable this ftp user.
- Adding a new user to the file server. (see above Adding new users section) or use an existing user name that is already been assigned on the fileserver.
- Connect to the file server, go to \disk1\_ftp folder, create a new folder with the folder name the same as the username.